Second Wig Cap + Tips

So I decided I wanted to try to correct the flaws in the first wig cap and went on to make a second. I was successful in fixing some of the problems in the first wig cap and now I figure I will use that first wig cap for testing purposes. Anyway on with my findings…

eartamp

So the first thing I did to prevent the tenting around the ears is I used a rubber band and attached it across the front of the face from ear to ear. Above is the side view, and I’ll show the front side view below for better understanding. 🙂

eartamp02

So, doing it this way across the front of the face basically it helps keep the rubber band out of the gluing area on the nape of the neck. It also successfully tamps down those ear tents that happen for a much more form fitting wig cap.

wrinkles

The second problem I encountered while making the first wig cap is that the fabric likes to wrinkle at the base of the neck and this makes for a less than smooth wig cap.

wrinklemigration

You can solve this by pulling all of the fabric over the ear so the wrinkles wind up in the front of the face where they will be cut off anyway. In the pic above I still have a couple wrinkles I need to move forward from the ear area, but with a little time it’s pretty easy to shove all the fabric around so the wrinkles are in the front.

wrinklesgone

And here’s the back of the head now with most of the wrinkles gone. Any wrinkles left over are below where I plan to glue.

secondcap01

And here is the finished wig cap after I went through the gluing and trimming process. As you can see the cap around in the ear area is no longer sticking up.

secondcap02

The left hand side still has a skooch-a-bit of a fly-up, but I figure that with the gluing of the wefts later that it will tamp down nicely. So, I think that about covers it for my experience making a wig cap using Loctite’s flexible vinyl adhesive. I now plan to start on wefting experiments using some cheapo costume hair. When I have enough info to share I will surely make another blog post!

Glue Testing for BJD Wig Making Part 2

So I continued with my tests in the first part of this post and I went ahead and made a full wig cap using Loctite’s vinyl/fabric adhesive and the power mesh material. Following the directions in the wig making tutorial on DoA, I wrapped my Zaoll’s head in saran, covered her body in an old washcloth and then used old hair bands to stretch the power mesh fabric over her head.

glueprocess01

Here she is after having the fabric stretched over her and one application of the glue. I should also mention that is it going to be helpful to have a tool to spread this glue because it is very messy and is not pleasant to get on your fingers. I used this small metal spatula shaped clay tool which you can see below.

claytool

The glue is easily washed off the metal tool after you are done applying the glue, and if you happen to accidentally leave some glue on it you can easily scrape it off since this glue does not bond to metal well. After you apply the first layer of glue you need to let it dry for about 2 hours, then I recommend you add a second coat for durability.

glueprocess02

Here’s my girl now with her glue all dried and I started drawing out the hairline where I plan to cut the cap. It was recommended in the tutorial that you also mark which direction you want your hair to go, this is helpful if you are gluing small batches of hair at a go and have a complex hairstyle. For me I have pretty much decided to use a synthetic fiber that I plan to weft, so I only marked the top center and a few directional lines. Also my hairstyle plan is not very complex. You should do what you feel will be best for you.

trim01

Here I did a rough trim, just taking off the excess fabric I had. In the next step I plan to cut along the lines I drew for the hairline.

trim02

Here I have the cap mostly trimmed to where I want it to be. I may need to take off a little more, but it’s always best to cut off too little rather than too much since too much and you have to start over again.

problem

Here’s the front of the wig cap…one thing that I feel is a problem is that it sticks up a bit around the ears since the fabric naturally tented around the ears when stretched. I don’t know if there is a way to prevent this from happening, but I think I am going to try making another wig cap tonight and I will do some more experiments. Overall though I think it’s a pretty stable wig cap to apply hair to. Here are some of the pros to using this type of glue….

flexible

The first pro is that it’s flexible, you can flip the wig cap inside out if you want to. It doesn’t have much stretch though, especially with 2 layers of glue.

watertight

The second pro is that it’s watertight. It may be hard to see in the pic above, but I poured water from the tap inside the wig cap here. Because the glue is water resistant this means you can use synthetic fibers like saran and nylon and be able to use all of the wet styling methods for these fibers. Though I imagine this opens up wet styling methods to natural fibers like mohair as well. Also because this wig cap can get wet you can also maintain it like you would a normal wig, like giving it a wash or using conditioning treatments on it.

One last pro for using this glue is that because it’s rubbery, there is more friction when it’s on your doll’s head so it is less likely to slide off or around on you. Actually this fact makes me want to try a silicon glue next because maybe you can make wig caps straight out of that and have all the benefits of a silicon wig cap inside your actual wig.

The things that are not good about using this method is that it stinks. You’ll want to apply the glue in your bathroom with the bathroom fan running. Let me be clear and say it’s not particularly toxic like spraying with sealers as there are no particles than can find their way into your lungs, but if you have sensitive sinuses the odor could give you a headache. When the glue is dry however it doesn’t smell anymore, it’s only when it’s still wet does it smell.

The other con would be the dry time. It takes 2 hours to dry, though I applied my second coat of glue a bit sooner than that since it was dry to the touch before then. The last con would be the price. Each tube runs around $3, which compared to inexpensive PVA glues at $1 a bottle and more glue per bottle, well I think you can see the difference. This being said though $3 for a polyurethane based glue is not a bad price, and you do have all the benefits of a polyurethane glue.

Well, I will have more info for you as I continue my experiments. Right now the Loctite glue is working well for me, but I haven’t actually applied any hair or tried to make wefts yet, so I don’t want to pass judgement on this glue just yet. 😉 Anyway more to come!

Glue Testing for BJD Wig Making

After being inspired by the “Crafting your own custom angora wig” tutorial thread on DoA, which is here if you are a member, I started to think I might like to try to craft my own wig too. I read through the thread about what glues to use and etc.. and then I thought to myself, why not try to use Loctite’s Vinyl, Fabric and Plastic flexible adhesive. It is waterproof, completely transparent, and FLEXIBLE! On top of this the base of this glue is type of polyurethane which in theory should make it safe for use on our polyurethane dolls. I have also used this glue in the past to plug up holes in the heads of Monster High girls, so I already know it’s safe on vinyl and doesn’t have any bad reactions to saran hair.

So, the first thing I did before going whole hog on making a test wig, was to test the glue with the material. I used power mesh fabric which is the fabric I bought for making wefted wigs a while back. I wrapped a highlighter with saran wrap and using rubber bands I stretched the test fabric onto the saran covered highlighter. Then I applied some glue to the test strip and spread it around with my smallest palette knife. I left it for 2 hours to dry and here are my results below.

glue-teststrip01

I was really happy to find that the glue peels right off of the saran. That was my first concern, that possibly the glue could bond to the plastic thus not being a viable option for wig making since nobody wants a layer of saran wrap inside their wig. XP Thankfully it does not and it also peels off with ease. The above picture shows the side of the fabric that was pressed against the saran. It’s a little shiny, and because it’s a rubbery material it provides some friction which is an added bonus because that means it won’t slide off the dolls head as easily.

glue-teststrip02

This is the top side of the fabric that was not in direct contact with the saran, note how you can’t see any shininess from the glue. 😉 This glue dries perfectly clear and it will stretch a little bit. There is a decent amount of stretch along the grain of the fabric, but much less stretch against the grain. Stretching too hard against the grain (to the maximum you can stretch the fabric before ripping the fabric) will cause some warping of your fabric and you run the risk of tearing the glue. My suggestion would be to use two coats of glue for added stability before you even begin applying any hair.

glue-tubetest

And here’s a final shot of the tube of glue that I used next to my little test strip. So far one of the potential drawbacks to using this glue is the wait time. You have to wait around 2 hours for it to dry. Another drawback is that with excessive stretching the wig cap can become misshapen. I am going to continue on with my tests since snow storms are keeping me inside and I will continue to report my findings as I go. My next step is to create a full wig cap for my Zaoll luv and then I should have more information for you.

Eye types for BJDs

I had gotten into an interesting discussion on DoA about the different types of eyes available and peoples preferences and such which I thought might make for a good blog topic. A lot of this information might be common knowledge to someone who has been deep into the hobby for years, but I think it might be helpful for people just starting out or even for people who have had dolls for a while but never investigated the different types of eyes available.

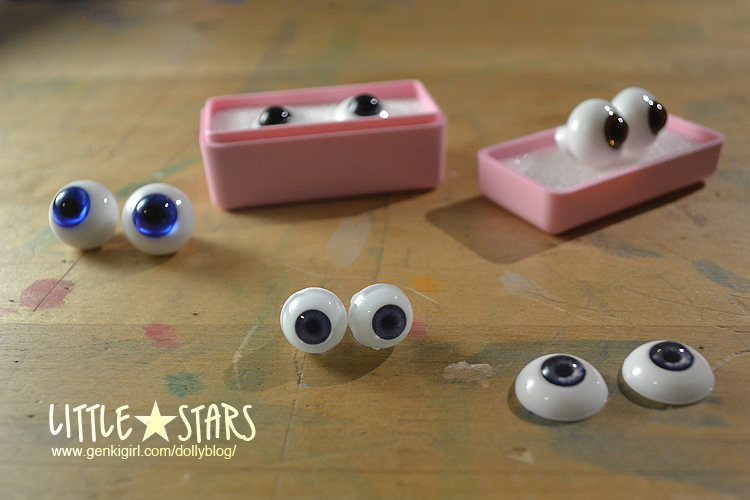
So the first type of doll eye we have are glass eyes. There are a few of mine in the picture below. I have others but I wasn’t about to go removing eyes from my dolls or anything, lol. Glass eyes are naturally, made of glass, and by many doll owners are considered to be the best type of eye. Glass really reflects light the best and can really make an eye light up, but often they will be less realistic than acrylics, silicon and sometimes even resin. It also pays to keep in mind not all glass eyes are created equal. Cheap glass eyes are just that, cheap and often they cannot even rival a good quality acrylic eye.

glasseyes01

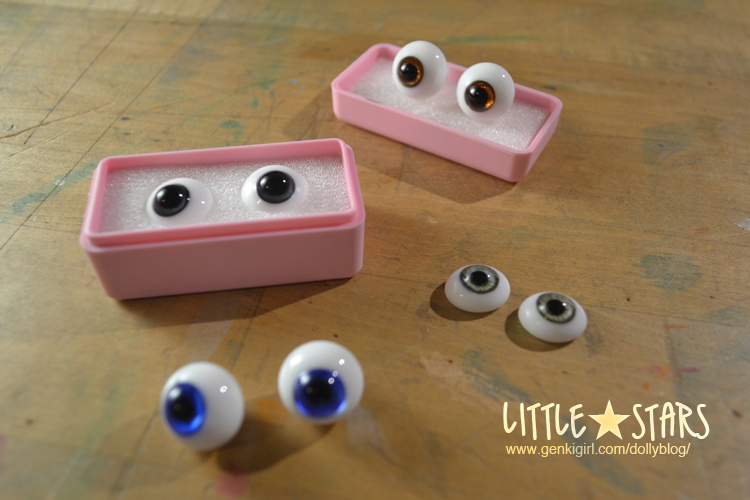
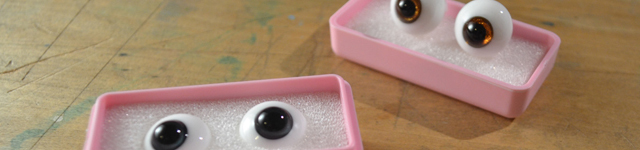
The blurry set of eyes in the foreground of the pic above are Mint on Card eyes, which were a free gift. The flatback eyes are Miniworld, and the black and brown pair sitting on parts of the pink box are both Dollmore. The black eyes, which if you look closely are actually a very dark charcoal gray are really very good quality. Rather than being straight black, the deep charcoal will give a slight hint of depth in the eye. They are a bit tricky to photograph though as often they will appear just black. The other pair are special Dollmore eyes and are extremely pretty, they have great clarity and the brown glitter in the glass really makes the eyes sparkle. Both of the Dollmore eyes I consider good quality.

glasseyeskemper01

Now on to the lesser quality eyes. Above is a cheap pair of glass eyes from Miniworld. Inside them there is a dotty print in a low lpi of an iris. Of course it has all the transparency and glossiness of glass eyes, but because the iris is some sort of print, it does not really refract the light.

glasseyes02

This next set of eyes are from Mint on Card, they are just their basic glass eyes that they sell. These were a freebie so I shouldn’t be too hard on them, but on the other hand, buyers should be informed. These eyes are not as bad as the Miniworld ones, they are all glass and they light up quite nice under the right conditions, BUT they are certainly a very goofy color of blue and the threading which you can just barely see in this shot is irregular. They also seem to like to cast their blue color into the whites of the eye at places as well. If you compare these eyes with the Dollmore eyes, there is no comparison, Dollmore wins.

siliconeyes01

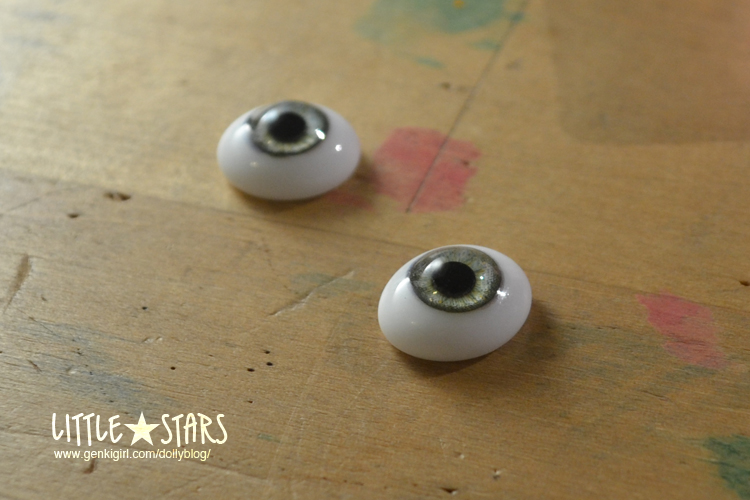
Next up are silicon eyes, this pair in specific is eyeco A113 I belive. The benefits of silicon eyes are they they are rubbery and therefore can bend and be pushed quite flush in the eye wells of a doll. Their irises are basically a print encased in clear silicon. Because they are a print they can be as detailed and as real looking as a human iris. However because they are a print, they can’t refract light, all sense of light from a printed silicon eye comes from the high contrast of light against dark in the print itself. Another drawback of silicon eyes are that because they are rubbery they can collect dust easily and may need to be wiped with a damp cloth periodically. Overall I do like silicon eyes, you can get some really nice variations of irises and if you have a doll with an odd or irregular eye well it’s easy to squish the eyes in there so you no longer have any hollow spaces around the eyes. I haven’t tried any other silicon eyes besides eyeco though, however people do seem to praise Soom eyes as well.

acryliceyes01

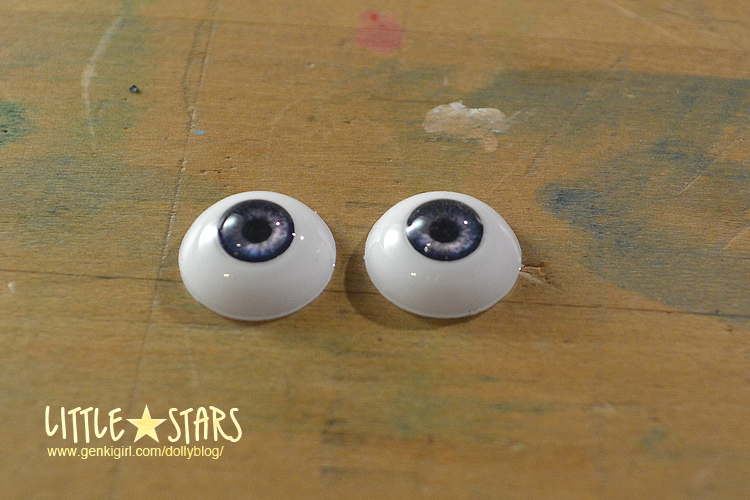
So now draw your attention to the pair of eyes in the middle of the shot above. Those are acrylic eyes and this particular pair happens to be my default unoa eyes in a dark blue. This isn’t my best pair of acrylic eyes sadly and they are just dark and don’t offer much reflection at all. If you want to see a better pair of acrylic eyes then have a look at my Lusis here: http://www.genkigirl.com/dollyblog/?p=1168 Her current pair of acrylic eyes can light up a little bit similar to glass, but not nearly as well as glass. So, acrylic eyes usually also rely on a print of an iris that is set under plastic. Occasionally you can also find hand painted irises, but those are kind of rare. Another benefit of acrylic eyes are because it’s a print, many different types of eyes such as cat eyes or fantasy eyes with symbols embedded in them can be done.

acryliceyes02

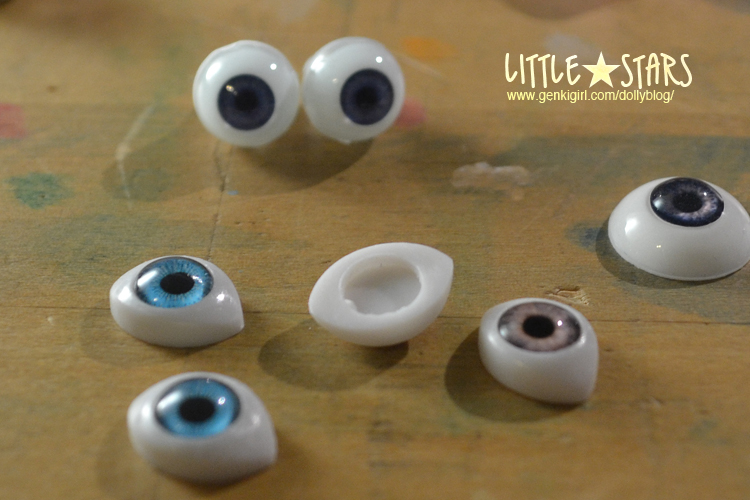
As with glass eyes, acrylic eyes can be good or bad quality. In the above pic you can see the worst quality acrylic eyes I have which came standard with my AE Yara. They are little hollow flatbacks in an odd shape that you can really play with to angle up, down or side to side because usually you wind up seeing the side of the eye and having a gap. On top of this the iris section of the eye is a completely different plastic part and there is a visible seam between the iris and white of the eye. The print of the iris isn’t anything to write home about either.

The last type of eye I will talk about are resin eyes. I do not have any resin eyes yet, but I do know that they are the best at imitating the reflective qualities of glass. Their only drawback is that like your dolls, they can yellow over time, that and they are often very expensive. Enchanted Doll sells eyes for $50 a pair, but they are definitely beautiful and something I might like to own one day.

alleyes

So, in the end basically remember this….you get what you pay for…If you buy a cheap pair of eyes, that’s what you are often getting, something cheap. A really great pair of eyes can make a big difference in the way you doll looks and is photographed.

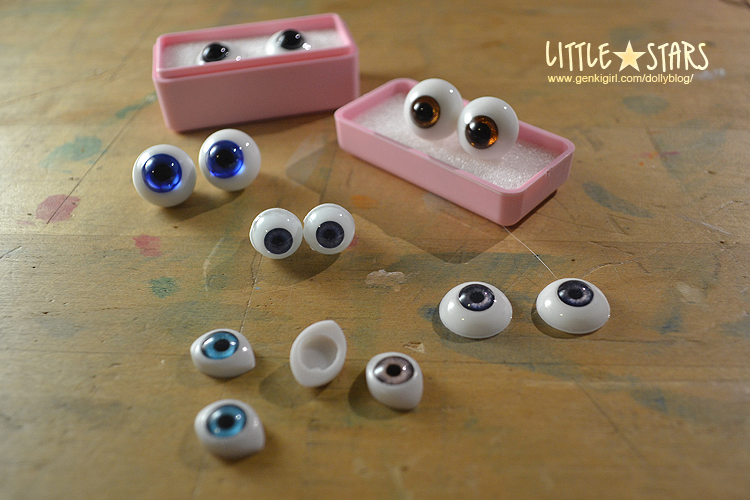
Here’s a quick list of the eyes in this post: Miniworld glass flatback, Mint on Card glass eyes, Dollmore glass eyes in Y03 (black), Dollmore Special glass eyes ET27 (brown), Asleep Eidolon acrylic, Unoa default acrylic, eyeco silicon A113. I will also be posting the “group shot” of eyes on my flickr and annotating them.

Face-up Removal – Winsor Newton Brush Cleaner vs. Acetone

brushcleanerpic

I finally got around to trying the Winsor Newton Brush Cleaner everyone seems to rave about on the forums and I thought I would share my experiences with using it for the first time. To begin with I have to say I am very skeptical of any sort of “miracle product”, which is how this stuff is made out to be, but I did find myself quite pleasantly surprised!

I used the brush cleaner to remove my Luli’s old face-up the other weekend when my Zaoll arrived, and I really was amazed because after rubbing the face-up with a cotton ball soaked in the stuff, the face-up started wiping away quite easily. You do have to apply a little bit of elbow grease however in comparison to using acetone, so it may take a few minutes more to wipe the entire face. The benefits to using the Winsor and Newton Brush Cleaner is that is doesn’t contain harsh chemicals that can potentially eat the resin. I’ve also read where people will let their doll heads soak in a solution of the stuff without incident, but eh…I’m not willing to try that yet. The drawback would be that it is going to take you longer, but I think if that’s the payoff for having a safer less harsh chemical, so be it.

I do want to say a word about being able to get into the tiny crevices of your doll with the cleaners though, because they differ here too. If you are trying to get dark corners out of mouths with the brush cleaner alone, it is going to be hard. For the most part on my Lusis I am regaled to using an old detail paintbrush to try to rub the cleaner in her mouth corners. You really have to apply pressure to remove heavier paints, and of course it’s difficult to apply pressure with a tiny paintbrush. In the end I gave up and gave the hard to reach crevices a wipe with the acetone since acetone can easily break down paints without any scrubbing.

In the end I think the Winsor and Newton Brush Cleaner is a great tool to have in your arsenal, but I wouldn’t ditch your acetone either. I find that Acetone can be helpful in removing tough spots left behind by the brush cleaner. You may be thinking then, well why buy the brush cleaner, why not just use acetone and be done with it? Well I shall tell you why….Each time you use acetone it does eat away at the surface of the resin, albeit in small unnoticeable minute amounts. However over time that wear can add up, so the more you can get away with cleaning a head without it, the better for the resin. If you only use acetone for small touch-ups, then that means less damage to the resin.

I realize everyone kind of has their own opinions when it comes to face-up removals, but I think I will continue to use the brush cleaner, and still hang onto my acetone for the tough business. I definitely will be glad to get away with using less acetone and I know my fingers will be glad for it too!