Experiment Light Diffuser.

I’ve seen a lot of neat little tutorials where people with smaller 1/6th scale dolls have made little light box diffusers to photograph their dolls in with a nice soft looking studio light. The only problem is that if you have anything larger than a YOSD or a Blythe you may find it difficult to create a light box big enough. On top of that if you wanted to photograph a room box with your dolls that also presents a problem. So I thought to myself, why can’t I just make some diffusers to use when I make a set for my MSD girls? And then I decided I would try it. 😉

diffuserbox01

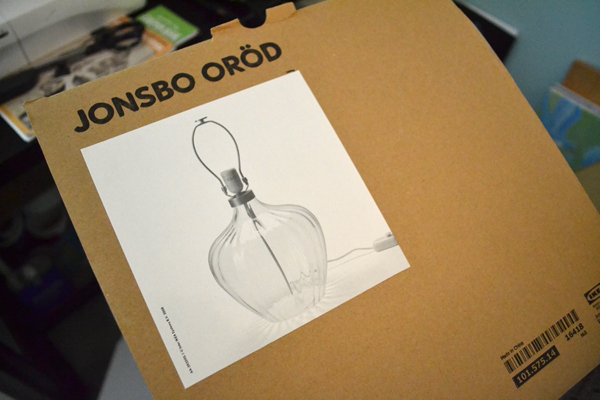
So I started with a box, in this case it was a lamp box my mother saved for me after she bought this lamp at Ikea. I feel like I’m advertising for them now or something, lol. Anyway….

diffuserbox02
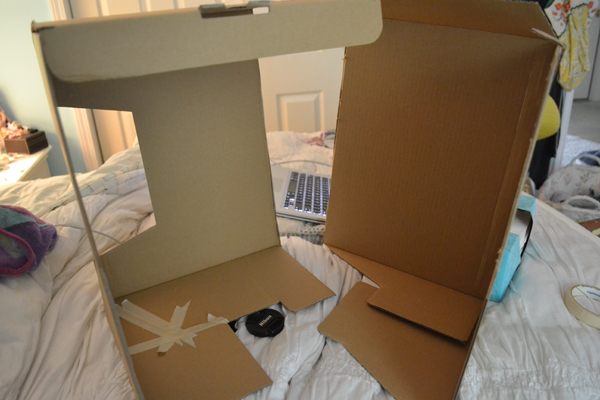
I slit the box down two corners, and this would be two corners diagonal from each other so in the end you wind up with two triangles of box and some bits of attached lids and bases.

diffuserbox03

After securing the box with some tape on the base so it will keep it’s triangle shape and won’t move on me, I decided the orignal lamp box opening wasn’t big enough and I decided to cut out a large rectangle of cardboard being sure to leave a good 2-3 inches around the outside.

Unfortunately I forgot to take a picture of the next step, but after you cut your window holes in the boxes you will want to tape a thin paper or tissue to the inside of the box, covering the window hole. The paper/tissue is going to be the part that acts as your diffuser, the rest is there for support.

diffuser04

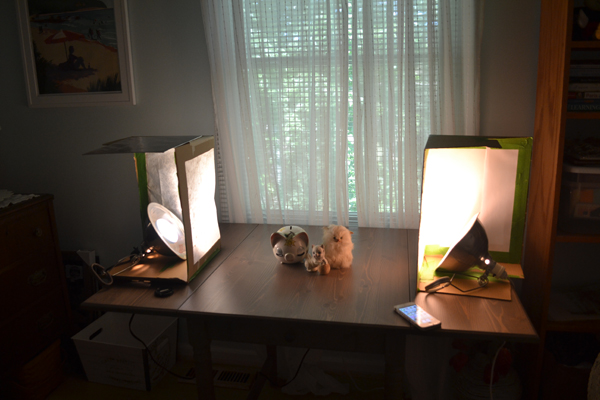
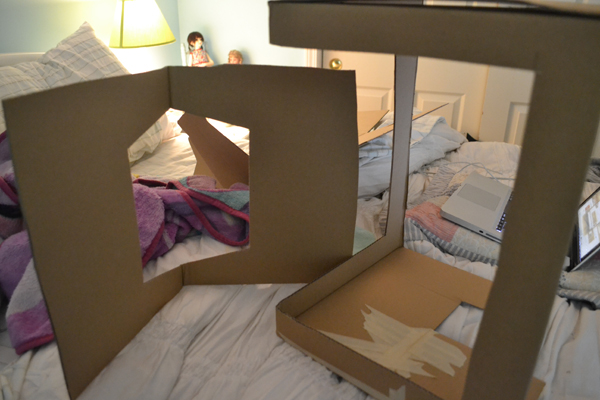
So here are my diffusers in action. You can see how I taped the paper to the windows, and basically I set clamp lamps inside. If you want to angle your lamps in a specific direction, you can put a heavy object like an art history book on the base for support and clamp your lamp to the side or top of the box. I imagine with a little work you could probably even figure out how to hang the box around a lamp that is higher up in the air, but I didn’t try anything like that.

diffuser06

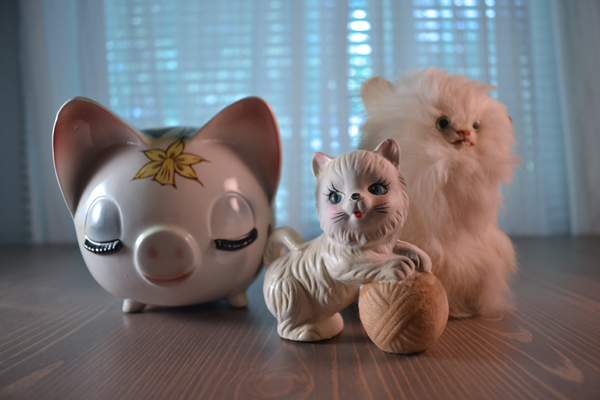
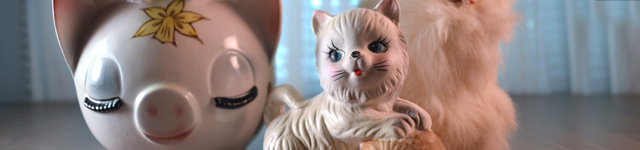
Annnnnd here is a test shot I took using the diffusers. In the end I applied a cooling filter to the image because these shots wanted to come out orange which kind of told me they were a bit under exposed, however I was using a low watt incandescent so there’s that too. Since I only have the kit lens on my camera I’m going to have to either add more lighting or get a new lens with a larger aperture setting. As it is, these were all shot at 1/60th at f3.5 which is the most my len’s aperture can open.

Anyway you can judge for yourself if you’d find something like this useful for your doll photography. For me the verdict is still out on these boxes. I am going to try working with them again when I plan to photograph my sewing projects and then make my decision. I might also use a more powerful light with more of a cool cast as well. If I come up with anything new I’ll be sure to blog about it!

“De-greasing” Saran Doll Hair

For those of you who may not have been aware like I was, saran doll hair usually has this slight filmy feeling to it, or as others have said it is “greasy” or “oily”. It truly is oily and has the unfortunate side effect of making your doll look like she has nappy no-shower in a week hair if you don’t wash it properly. You can see in the picture above that the doll hair on the left has this oily problem, whereas my freshly washed sample piece on the right does not. I spent quite some time google searching methods to degrease hair with no luck, so finally I just started experimenting with things until thank heavens I found something that works!

So here’s what you need to do to get that greasy, oily feeling out of your saran hair…..wash it with a dish soap that has a degreaser in it. It’s as simple as that. Most dish soaps on the market have some sort of degreaser in it, for me, we had Palmolive in the house so I just used that, but I’m sure any other quality dish soap on the market will work. After I gently washed the fibers in the dish soap I made certain to rinse the hair thoroughly, because obviously you don’t want to leave soap film in the hair. Here’s my tip though, don’t blow dry the hair afterwards. I found that with my test sample of washed hair that blow drying the hair caused it to get a static build-up with flyaway hairs. Letting the hair naturally air dry solves this problem, however it will take all day. 🙁 I even set my dolls head out in our 103 degree summer heat outside and it took her hair all the way until the evening to be mostly dry!

Well, that’s it for now, hopefully if you were struggling with this problem I was able to help you out! Look for more progress on my custom Draculaura soon now that I’ve “de-greased” her hair, lol.

Monster High Custom – Just Beginning


After my dollyhair order came in I wanted to get started on my custom Draculaura right away while I am still feeling all excited about the new hair. The first thing you have to do naturally is remove the head. Most tutorials I saw suggested running the head/neck area under water until the head became soft enough that it would allow the anchoring apparatus to be pulled out of it. Personally if I can avoid using water I will, and I found out that it’s quite easy to just take a blow dryer, blow dry the head/neck joint area for 30 seconds or so until hot, and then just pull and yank the head off while it’s still hot from the dryer heat. It took me all of a minute and I didn’t have to get anything wet or wait for hair to dry or anything.

Next step was to cut off all of her hair, lol. Anyway for whatever reason I felt like saving the cut hair, it’s too short to root with, but I imagine it could still be useful for MLP tails or maybe it could even be wefted and used for a Brownie wig, who knows.

After cutting the hair, you then need to take your tweezers and start pulling out what’s left of the hair from the inside of the head. Often times there is glue inside rooted doll heads, and there definitely is in MLP toys, but I was pleasantly surprised to find that there was NO GLUE inside my Draculaura head. You may be wondering then what was holding it all together, and I shall tell you what I suspect. I suspect they use heat to melt the hairs inside the head, but I can’t be positive. At first I thought it was loop rooted, but then I started noticing these tiny bits of melted plastic bits here and there falling out. Either way because there appears to be no glue, once you start breaking apart and pulling out plugs of hair, you can also pull hair from the outside of the head as well, which is helpful because Monster High dolls have small neck holes. Also one more tip is to squish your scalp close to your neck hole so you can easier see the hair and nab it with the tweezers.

After removing all of the hair, it’s time to wipe the face paint off. Customizers will argue up and down on what to use to do this and what not to use and they are often contradictory. Some people swear by Windsor and Newton brush cleaner, while others will tell you acetone, in the end it’s your call what to use. I myself for this particular doll used acetone. Acetone will without a shadow of a doubt remove all the paint from the head no problem, BUT it will take a while because the paint WILL SMEAR so expect to spend a good 15 minutes scrubbing the head. Don’t panic though once you see a smear, because it will come off with a fresh cotton ball and more acetone. Because the paint smears, you will also have to spend time removing the scalp color because there is no way you can remove the face well enough without accidentally hitting the scalp color and smudging it all over the place. My last piece of advice when dealing with acetone is be sure to rinse your doll’s head thoroughly in water afterwards!! Acetone is a solvent used to remove resins aka plastics, so it can destroy your doll if you do not fully rinse and wash all residue off afterwards. It should also go without saying that you should never leave a doll to soak in the stuff, like EVER.

Anyhow, moving along, in the above pic you may notice I have a spot circled on the dolls head and I have out a tube of glue. You see, when they rooted Draculaura’s hair in the factory they put some plugs so close together in her front part that it kinda made a big hole. 🙁 After some research I found that the best thing to do would be to fill the hole with a flexible glue. To be honest there really isn’t that much information that I was able to find out there for patching doll heads. The one site I did find with the most info suggested gel super glue, however just because a super glue says it’s gel doesn’t mean it will dry flexible. I figure that it is necessary for the glue to dry flexible otherwise the glue will just pop out during the reroot process. I have decided to try Loctite’s vinyl and plastic glue that dries flexible. Doll heads are vinyl afterall, so the theory is this should work. Anyway taking a toothpick dipped in glue, I carefully put a few drops in the problematic hole (the area circled). This particular glue dries in 30 minutes, but requires 24 hours to cure, so I plan to leave the doll alone now until sometime tomorrow. I’ll just have to wait and see how well it fares against the reroot tool!

EDIT! – I am happy to report that the Loctite vinyl and plastic glue works fabulously! 😀

Dollyhair Comparisons

So my dollyhair order finally arrived and I went ahead and shot some fiber comparison pics in the hopes that it might be helpful for other people who are trying to match colors and whatnot. Above is the Kohl Brown Kanekalon hair from dollyhair.com next to my Liv wig. It is a very very close match and will do nicely for patching up the bald spots in the wig. The fiber of the Liv with though is a little smoother and softer, but it is definitely not saran, and has that “dry feeling” like the Kanekalon, and is too fine a fiber to be the nylon. So I’d say it’s up in the air as to what kind of fiber this wig is made out of.

These are the two shades I am waffling between for my Draculaura re-root. On the left is Bitter Chocolate Brown, and on the right is Raven Black. Raven Black is of course a true match for Draculaura’s factory hair, but it’s not hard to match blacks usually. :B The Bitter Chocolate Brown is actually a bit darker than in the photo. It is as advertised as being the closest brown you can get to black and it does not have any red tones.

Next up is the Sherbert Pink comparison. As you can see from the pic that Draculaura’s hot pink streaks are a scootch bit darker than Sherbert Pink. It is very close though, so probably if you wanted to just add a few extra strands of pink in her factory hair, you could probably get away with using this color depending on how fussy you are. I actually bought this hair for a custom Twilight Sparkle I plan to work on after I finish Rainbow Dash who is coming along nicely by the way!

Lastly I bought some Hematite (on the left) and Pacific Ocean (on the right) nylon hair. This pic is fairly close to the true color, though in person I feel you can see the hint of plum in the Hematite more and Pacific Ocean has a touch more teal in it. I purchased these two colors with the intention of rerooting my Twilight Sparkle with them. Seeing Pacific Ocean in person though makes me feel that straight Hematite may work best for her reroot though. Originally I thought to mix the two colors, but now I’m not so sure. Anyhow all of those color comparisons are for another day as I am nowhere near starting that project yet.

Rerooting Tutorials

While I’ve been waiting for my order from Dollyhair to arrive, I’ve been scouring the internet for any tutorials or general information I can find about re-rooting and the different kinds of fibers and such that you can buy. I figure I’d go ahead and make a posting and share what I’ve found so far.

Mohair and Alpaca related

My Monster Crush: This blog seems to focus on Monster High dolls, and this particular posting has information on making doll wigs out of feathers as well as re-rooting with mohair.

Wedge’s Mohair Tutorial: This is a image on flickr…look for the “BIG” link in the description to see the larger image. Anyhow this tutorial is Blythe centric and again focuses on how to reroot with mohair.

Mademoiselle Blythe: This is another Blythe focused blog, but this posting has a TON of information on the differences between mohair and alpaca, as well as an overview of rerooting and TONS of helpful links on where to find mohair and alpaca fibers as well as more tutorial links.

Saran and other fibers

The Manor: This specific posting has a lot of information and pictures to illustrate the differences between Nylon, Saran and Acetate doll hair.

Wide Eyed Girls: This site has one of my favorite nylon/saran reroot tutorials. It has lots of pictures and I think shows the simplest part thatching method for creating part lines n’ that.

Suppi.net: This link will take you to a search result page after searching for “reroot”. Has many different posts with random information on rerooting, BUT it most importantly contains information on good hair color matches for Monster High Draculaura complete with pictures and fiber names.

This is all I have collected so far. Of course Dollyhair, My Little Customs, and Restore Doll each have their own little tutorials section, so it would be a good idea to scour those too if you are looking for more tutorials. Lastly, if you happen to know of any other great rerooting tutorials or fiber information sites please feel free to post the links in the comments!! Any posts containing links though will have to be moderated by me first as a spam prevention, but don’t worry, they will get through!