Face-up Removal – Winsor Newton Brush Cleaner vs. Acetone

brushcleanerpic

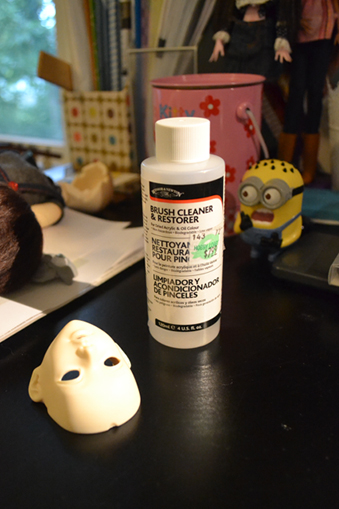
I finally got around to trying the Winsor Newton Brush Cleaner everyone seems to rave about on the forums and I thought I would share my experiences with using it for the first time. To begin with I have to say I am very skeptical of any sort of “miracle product”, which is how this stuff is made out to be, but I did find myself quite pleasantly surprised!

I used the brush cleaner to remove my Luli’s old face-up the other weekend when my Zaoll arrived, and I really was amazed because after rubbing the face-up with a cotton ball soaked in the stuff, the face-up started wiping away quite easily. You do have to apply a little bit of elbow grease however in comparison to using acetone, so it may take a few minutes more to wipe the entire face. The benefits to using the Winsor and Newton Brush Cleaner is that is doesn’t contain harsh chemicals that can potentially eat the resin. I’ve also read where people will let their doll heads soak in a solution of the stuff without incident, but eh…I’m not willing to try that yet. The drawback would be that it is going to take you longer, but I think if that’s the payoff for having a safer less harsh chemical, so be it.

I do want to say a word about being able to get into the tiny crevices of your doll with the cleaners though, because they differ here too. If you are trying to get dark corners out of mouths with the brush cleaner alone, it is going to be hard. For the most part on my Lusis I am regaled to using an old detail paintbrush to try to rub the cleaner in her mouth corners. You really have to apply pressure to remove heavier paints, and of course it’s difficult to apply pressure with a tiny paintbrush. In the end I gave up and gave the hard to reach crevices a wipe with the acetone since acetone can easily break down paints without any scrubbing.

In the end I think the Winsor and Newton Brush Cleaner is a great tool to have in your arsenal, but I wouldn’t ditch your acetone either. I find that Acetone can be helpful in removing tough spots left behind by the brush cleaner. You may be thinking then, well why buy the brush cleaner, why not just use acetone and be done with it? Well I shall tell you why….Each time you use acetone it does eat away at the surface of the resin, albeit in small unnoticeable minute amounts. However over time that wear can add up, so the more you can get away with cleaning a head without it, the better for the resin. If you only use acetone for small touch-ups, then that means less damage to the resin.

I realize everyone kind of has their own opinions when it comes to face-up removals, but I think I will continue to use the brush cleaner, and still hang onto my acetone for the tough business. I definitely will be glad to get away with using less acetone and I know my fingers will be glad for it too!

Monster High Custom – Just Beginning


After my dollyhair order came in I wanted to get started on my custom Draculaura right away while I am still feeling all excited about the new hair. The first thing you have to do naturally is remove the head. Most tutorials I saw suggested running the head/neck area under water until the head became soft enough that it would allow the anchoring apparatus to be pulled out of it. Personally if I can avoid using water I will, and I found out that it’s quite easy to just take a blow dryer, blow dry the head/neck joint area for 30 seconds or so until hot, and then just pull and yank the head off while it’s still hot from the dryer heat. It took me all of a minute and I didn’t have to get anything wet or wait for hair to dry or anything.

Next step was to cut off all of her hair, lol. Anyway for whatever reason I felt like saving the cut hair, it’s too short to root with, but I imagine it could still be useful for MLP tails or maybe it could even be wefted and used for a Brownie wig, who knows.

After cutting the hair, you then need to take your tweezers and start pulling out what’s left of the hair from the inside of the head. Often times there is glue inside rooted doll heads, and there definitely is in MLP toys, but I was pleasantly surprised to find that there was NO GLUE inside my Draculaura head. You may be wondering then what was holding it all together, and I shall tell you what I suspect. I suspect they use heat to melt the hairs inside the head, but I can’t be positive. At first I thought it was loop rooted, but then I started noticing these tiny bits of melted plastic bits here and there falling out. Either way because there appears to be no glue, once you start breaking apart and pulling out plugs of hair, you can also pull hair from the outside of the head as well, which is helpful because Monster High dolls have small neck holes. Also one more tip is to squish your scalp close to your neck hole so you can easier see the hair and nab it with the tweezers.

After removing all of the hair, it’s time to wipe the face paint off. Customizers will argue up and down on what to use to do this and what not to use and they are often contradictory. Some people swear by Windsor and Newton brush cleaner, while others will tell you acetone, in the end it’s your call what to use. I myself for this particular doll used acetone. Acetone will without a shadow of a doubt remove all the paint from the head no problem, BUT it will take a while because the paint WILL SMEAR so expect to spend a good 15 minutes scrubbing the head. Don’t panic though once you see a smear, because it will come off with a fresh cotton ball and more acetone. Because the paint smears, you will also have to spend time removing the scalp color because there is no way you can remove the face well enough without accidentally hitting the scalp color and smudging it all over the place. My last piece of advice when dealing with acetone is be sure to rinse your doll’s head thoroughly in water afterwards!! Acetone is a solvent used to remove resins aka plastics, so it can destroy your doll if you do not fully rinse and wash all residue off afterwards. It should also go without saying that you should never leave a doll to soak in the stuff, like EVER.

Anyhow, moving along, in the above pic you may notice I have a spot circled on the dolls head and I have out a tube of glue. You see, when they rooted Draculaura’s hair in the factory they put some plugs so close together in her front part that it kinda made a big hole. 🙁 After some research I found that the best thing to do would be to fill the hole with a flexible glue. To be honest there really isn’t that much information that I was able to find out there for patching doll heads. The one site I did find with the most info suggested gel super glue, however just because a super glue says it’s gel doesn’t mean it will dry flexible. I figure that it is necessary for the glue to dry flexible otherwise the glue will just pop out during the reroot process. I have decided to try Loctite’s vinyl and plastic glue that dries flexible. Doll heads are vinyl afterall, so the theory is this should work. Anyway taking a toothpick dipped in glue, I carefully put a few drops in the problematic hole (the area circled). This particular glue dries in 30 minutes, but requires 24 hours to cure, so I plan to leave the doll alone now until sometime tomorrow. I’ll just have to wait and see how well it fares against the reroot tool!

EDIT! – I am happy to report that the Loctite vinyl and plastic glue works fabulously! 😀

Removing Lusis’s Face-up

I started removing the two face-ups from My Lusis faceplates last night, which turned out to be quite a lot of hard work, though it did provide amusement. You can see from the pic above that I was literally peeling the lip paint off of this doll, this is how thick the paint was applied. ^^; For the most part though, after a swipe with isopropyl alcohol and a soak in warm water I was able to peel a lot of the paint off with my fingernail. However the corners proved to be stubborn and I had to carefully use my clay-working needle tool to carefully prick and pull out the paint that was crammed into tiny corners. The eyes also had a lot of dried glue around them which required a lot of soaking in warm water to get the glue pliable enough so it could be removed. There were a couple spots of paint in the eye wells that didn’t want to come off for me despite resorting to using acetone on them, but I chalk it up to being the rough surface that needs a gentle sanding. Anyway I have to say that if you can peel off your face-up like in my pic above, “UR DOIN IT WRONG!” XD (the face-up that is).

Here they are all cleaned up and ready for customization. As you can tell from the photo, Lusis R (right) has her mouth opened a tiny bit more than Lusis L (left). Also Lusis R’s mouth is a tad asymmetrical. I think I should be able to fix this easily enough with gentle sanding. For Lusis L, she’s in great shape except the seam line around the edge of her plate is rough and needs a little sanding. Both of these girls just need a little gentle finishing sanding really, but overall they are in excellent shape. I suppose I should also record that both of them have had their eyebrows sanded, however there is a very slight, faint sort of smooth ridge where they used to be. I’m not sure if I will sand them any further or not. I guess we’ll see when I decide to start working on their face-ups.

A Sorta Face-up Removal Tutorial from a Newbie’s Perspective

yaranoface So for a while now I had been dissatisfied with my Yara’s face-up, as her eyebrows seemed too close to her eyes and her lip color was a little too bland for my tastes. Being an artist I already knew I had all of the pastels and watercolor pencils to do those nice natural face-ups you see online, so after reading some more tutorials I finally decided to take the plunge and I went out to grab a fresh can of Testors and some acrylic gloss.

So, first things first, on every tutorial you start with washing off the existing face-up. I remember that a couple of the tutorials I had seen said to just wash the face with warm water and soap, using a toothbrush for scrubbing. Well I did that and the face-up didn’t budge, not an inch! Though the eyelashes fell right out nicely after the soaking, so I picked them up and saved them for later. I remember thinking to myself that Asleep Eidolon then must seal their face-ups really well, but instead of congratulating myself on the quality of my own doll, I was instead vexed and decided to head over to DoA to find out more about removing face-ups.

On DoA the first thread I come to is recommending using Acetone to remove the face-up, but I’m like, wait a minute won’t the Acetone eat the resin? Curious though, and really wanting to remove this face-up now that I was committed, I read on. Apparently you can use Acetone or nail polish remover to remove the face-up, BUT you need to be sure to thoroughly wash off any residue, because leaving Acetone sitting on your resin will indeed ruin it. I guess there are two different camps on this issue though, those who feel you should not use Acetone, and those who think it’s ok as long as exposure is minimal and you are sure to thoroughly wash it afterwards. Desperate to get the face-up off I decided I would try some nail polish remover that had acetone in it. I did so, and slowly the face-up started deteriorating and I was able to begin to scrub it off. However there are problems with nail polish remover. First of all, if your nail polish remover has any tinting in it, it can stain your resin, and secondly it is still going to take a while and be smelly. I knew from experience with image transfers that pure Acetone would probably work better, so throwing caution to the wind I finally took some pure acetone to my dolls face and within seconds the face came clean and she is not horribly disfigured from contact with Acetone.

So in the end my advice is to screw trying to scrub a face-up off with soap and water. If you have a factory sealed face-up, it is so not coming off with soap and water, not even if you scrub it with a toothbrush or nail brush. This is good news though because it means your face-up is really resilient! Previously before I tried this I thought face-ups were much more delicate than they are. In the end, just use straight acetone which you can get cheaply at any hardware store, just be sure to wash and rinse thoroughly afterwards.

Next I’ll write about my adventures with sealer and whatnot. Right now my Yara’s face has a fresh coat of Testors on it that looks like it’s ready to take pastel. Adventure! XD