
Ok, so this pattern and tutorial is for making panties for a skinny MSD. The doll I was working with is my AE Yara, and in comparing her measurements with Unoa, it looks like this panty pattern should also work for Unoa and the 43cm Narae. Anyway before I get on with the tutorial, all I ask is that you don’t post my pattern elsewhere or use it for monetary gain.
With that out of the way, we are ready to begin! Now I’m going to put the rest of this tut behind a cut since it’s very image heavy, but you’ll need the pattern first, so here is a link to grab it:
http://genkigirl.com/dollyblog/extras/skinnymsdpantypattern72.jpg
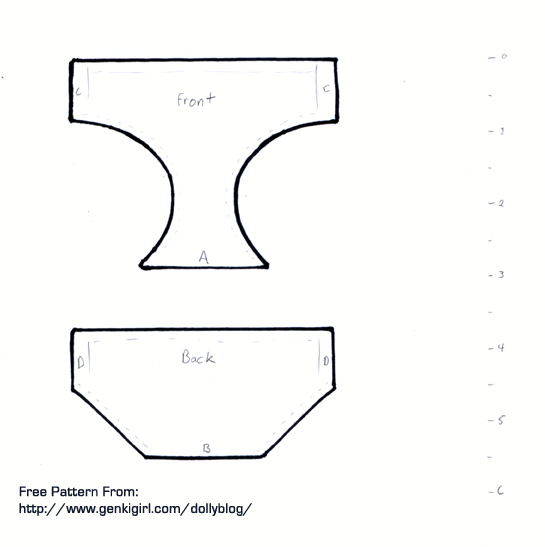
Now once you get this pattern, print it out at 100%. If it prints out anything other than 100% the sizes will be off, so be sure to check your scale when you print. To double check that it printed the right size, I marked along the side where each inch would fall, so compare that with your ruler. If it doesn’t match up to your ruler, it’s been printed wrong.

Ok so after you have the pattern printed at the right scale, the next thing you’ll do obviously is cut the pattern out then pin it to your choice fabric and cut out the pieces. Now here is my big suggestion….Use real panty fabric for this! If you have an old, clean, pair of panties lying around that you don’t like anymore, use them! If you find some cheap ones at the dollar store, use them! The fabric used in ladies panties is thin and super elastic-ey and will be way better than what’s available at JoAnns….or at least my JoAnns anyway. However, if you do decide to hack up some panties for this, do cut off the elastic around the edges first before cutting your pattern pieces, it will help the fabric lay nice and flat.

Ok, so after you have things cut out, you are going to want to join the crotch pieces. On the pattern I marked them A & B, so put those two parts facing each other and sew them together. I used a very tiny seam allowance for this, probably close to 1/8th, AND I sewed over it twice for good measure. Now at this point I would also like to mention that there are other panty patterns out there that are one full piece, which makes things easier, but doing it this way adds more realism…well at least I think so.

The next thing you want to do after you get the crotch sewn together is to start doing the leg hems. To make it easier do one side at a time, and fold over the fabric about 1/8 of an inch and pin it in place. After you accomplish that, take your time and sew a nice even line as close to the edge as possible. I say that because if you try to get as close to the edge as possible your hem should be nicely centered. XD Seriously though, take your time with this part so your hem line doesn’t come out wonky.

After you get one side done, move on to the other side.

Once you have both of the leg hems done, it’s time to start working on the waist hem. Go ahead and pin down both the top of the front and the top of the back. This hem can be a little larger, around 1/4 inch. A this point you can also alter the panties a little bit if you like. You can fold over the fabric more for skinnier bikini style straps, or less for a more hipster style.

Now the important part is that you need your hems to match up, so be sure you fold over the pants and have a look at the edges to check and make sure they line up. If either the back or the front is too wide and overlapping the other side, then adjust it so they line up.

After you get everything pinned up, then sew long the hem. When you get the waist hems done, then you are finally ready to join the sides. Now I was bad and I didn’t get a shot of joining the sides, but basically from this point, as indicated on the pattern you will fold your right sides together and join side C to side D on both the left and right sides. The seam allowance here is 1/4 inch. At this point you can also give them a test run on your doll, and if your doll’s hips are little wider or thinner, you can just adjust the seam allowance to accommodate them.

Now for the final step, after you join the sides, you are going to be left with some leftover fabric on the inside as shown in the picture. What you will want to do is trim this down a bit and then to finish it neatly, open the seam as I have done here and either hand stitch a quick tack stitch to hold the seam edge flush to the inside of the pants, or you can stitch those bits down on the machine by just following your hem to sew those flaps down. Personally I think the easier way is to hand stitch it real quick….or you could be lazy and not do the finishing at all, BUT your pants will lay nicer if you take the time to do it.

And the results…ta-da!

Baby got back…lol. XD Anyway these are just some basic cotton panties, but you could also fancy them up if you want to and add stretchy lace edging, tiny flowers, bows, or whatever floats your boat.
Well, I hope my tutorial wasn’t too sucky, this is the first sewing tutorial I’ve made, so go easy on me, ok?
I think these are so cute I just got my Bobbie doll she is an MSD. and I love making doll there own clothes.
I know how you feel! I love sewing for my dolls, I only wish I had more time for it. I hope you enjoy your new MSD girl. 🙂
I used you pantie pattern to make a pair for my girl. I used an old purple sleeve from a shirt I cut up. The panties turned out great..
Cool! I’m glad it worked out for you. 😀 And what a good idea to use a old t-shirt sleeve!
i am going to use your pattern and try to make Jo some lace panties
thank you, I will have to print out the pattern and give it a try.