SD/SD17 Size Room Box Progress.

I had a chance to get more work done on the SD/SD17 scale roombox, and I’m really pleased with how things are going so far. Come tomorrow though it’s back to work so I’ll have to focus on that and if I get my work done early then I might have a chance to get a little more done. :3 Anyway the two main things I worked on since the base was created is I started painting the walls and I created the window.

bluepaint01

I decided to pain the back wall of the room box a pale blue color. It was actually some paint we had leftover from repainting the bathroom. I really like the color and since I plan to do a pastel shabby shic, beachy sort of room I thought it would work well.

frame01

While I waited for the paint to dry to add more coats of paint to the back wall I started constructing the window. Above is just the frame of the window. Previously I had always framed out the window directly onto the window cut in my other dollhouses. This time however I decided that I will create the window entirely and then just seat it into the window cut when I am finished. The main reason I am doing this is so I can use pin hinges for the window. If you don’t know what pin hinges are, they are basically hidden pins that hold together the window to the frame and allows them to pivot. For more information, just google dollhouse pin hinges and some great tutorials should come up.

windowpanels02

Here I have two window panels made and I’m preparing to glue in all the sash crossbars. Both of these panels fit inside the frame which is off to the side.

sashes01

Here’s a bunch of the sashing being done.

sashes02

And here it is completed! At this point I start sanding any trouble spots, and I also want to make sure that the window panels will be able to fit nicely together and also be able to open freely. Normally something gets a little off when creating a window so I have to do some sanding on the sides so the window panels don’t fit so tightly into the frame. After sanding everything I started on painting the window frame and panels white. I don’t have any pictures yet because the one shot I took turned out a bit too dark. XP Anyhow I will say though that when painting the window and frame I use acrylic paint that I thin down a little bit. You want it to be thick enough to coat, but also thin enough not to be clumpy or build up horribly. That small fraction of a millimeter of paint on the window could make the window fit too tight again, so it’s best to start with thinned paint and build up slow even coats of paint.

I should also mention that I started painting the side wall white, and I think I’m going to play around a little bit with beams and paneling on that wall. Well, that’s pretty much it for now. I plan to work on it a little more tonight before bed and then if I can get my work done early tomorrow maybe I can squeeze in a little more room box time. 😉

SD/SD17 Size Roombox Project

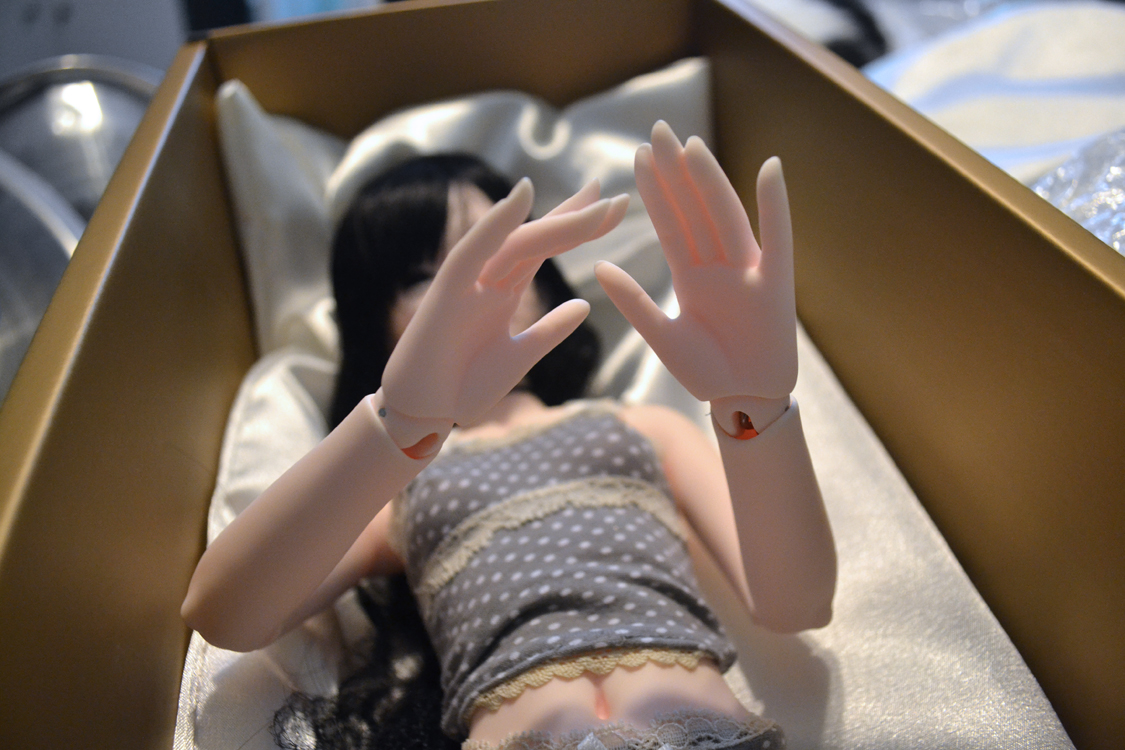
Well I guess I decided to go crazy and I’ve started building a gigantic room box to use as a backdrop in my doll photography. This particular room box was designed with my Mio/Zaoll hybrid in mind who is 52cm, as well as my future plans for a 65cm boy, as well as leaving the window open for it to work well with the 60cm dolls. Beyond that I also have the hope that my MSD sized dolls could also make use of the space as well despite it being more to the scale of the 52cm to 65cm dolls. Another key point in making this piece is that it absolutely has to be collapsible because I just do not have the space for the sheer size of this thing! Anyway enough introductory blabber and on with the production. 🙂

planning

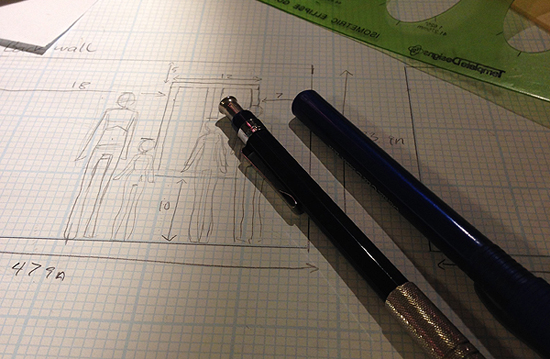
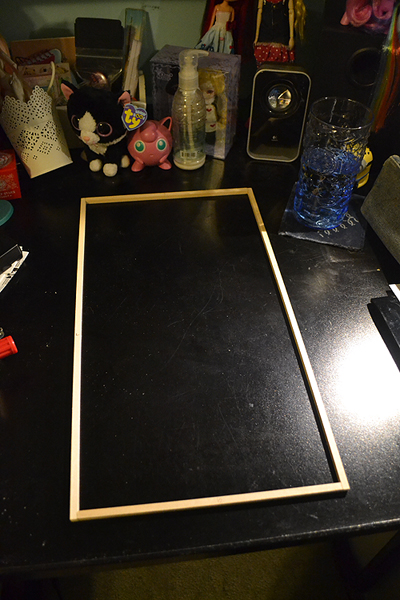
So as with all large projects, it’s best to start out with a plan on some graph paper. I spent a couple days researching other room boxes and then took extensive measurements of my current dolls as well as the few key props they have like chairs. Because this house must also work for 60-65cm dolls as well I also sketched their sizes into my plan mock-up so I could have a better idea of how big my window needed to be. I knew I wanted the window to be large and I also wanted all of the dolls to be able to look out it and to be able to open it (it will be a casement window on pin hinges that I will have swing out and/or in). In the end my window ended up being 10 inches wide by 18 inches long….it’s a long window, but it enables all the heights of dolls to look out it.

Speaking of measurements, here is what I arrived at for my final dimensions…The room box is 47 inches wide, 31 inches deep and 33 inches tall. To keep this in perspective, it’s about 75cm in height so even a 70 cm doll could stand and be photographed in it, though I feel those dolls are probably a bit too big for me to handle. ^^;

Now on to the materials I chose. For the walls I decided to go with 1/4inch birch plywood, because the walls will be hinged, I knew that the weight and size of the 1/2 birch plywood would be too unwieldy for me to comfortable handle. The only problem with using 1/4 birch plywood for the walls though is that at the size needed for the 60cm range dolls, they wouldn’t be very stable. My dad gave me the idea though that to rectify it we could make a “frame” on the back of the boards out of 1 inch thick 2 inch wide boards the length of the walls. For those boards I just used some packaged Aspen because I didn’t want to deal with the less expensive but lesser quality boards which could have warping or cause other problems. For the base I chose 1/2 inch pine plywood. The base needs to be solid to hold the walls and they will also suffer the most as it is the floor afterall. Lastly I needed hinges and they needed to be long with how we were going to butt the walls together in the corner, so we went with strap hinges.

gluingframes

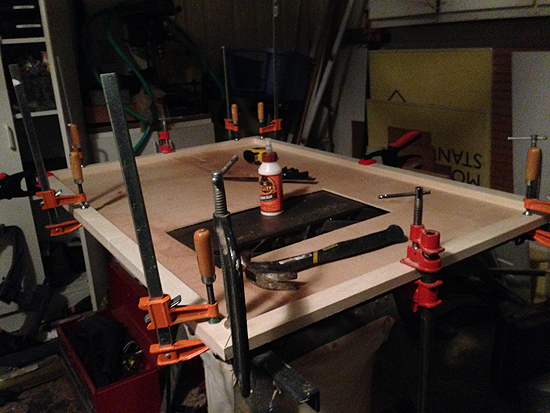
Ok, so after planning and buying all of the necessary wood, we started on building it the next day. I’m going to say that if you have help, getting the bare base of your room box done is totally do-able in a day. The above picture was taken after we had cut down all the of the boards to their proper size and had cut out the window. I will mention that to cut a window you will need a saber saw and a drill. You drill a hole somewhere in the middle of your window (the part that will be cut out and scrapped). The hole needs to be big enough that you can fit the saber saw blade into it. Once you do that start up the saber saw and start sawing at a smooth curve towards your cut line so that when you meet with your cut line you will be parallel to it, then just follow your line as straight as humanly possible. If you fudge up a little bit, it won’t matter, and don’t expect the window cut to be perfect…you will frame it out later anyway so if there are a couple little wobble gaps, those will get filled in with putty and eventually covered with the window trim. That’s getting a bit ahead of ourselves at the moment though, so I’ll talk more about that later.

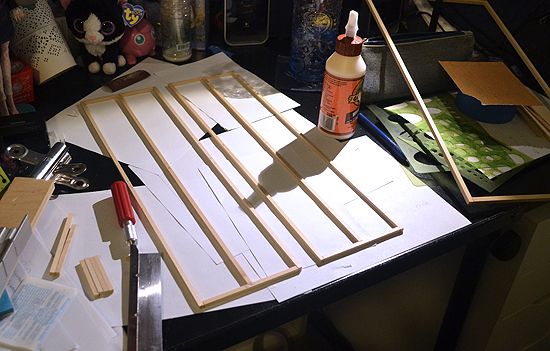
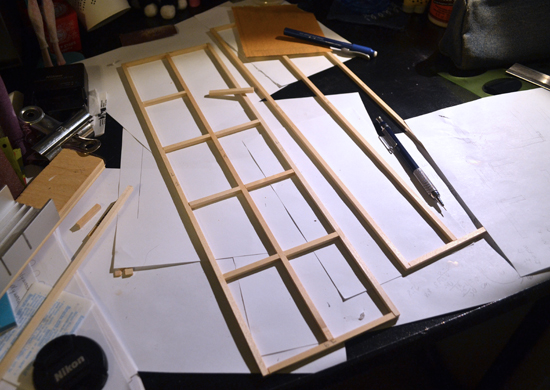
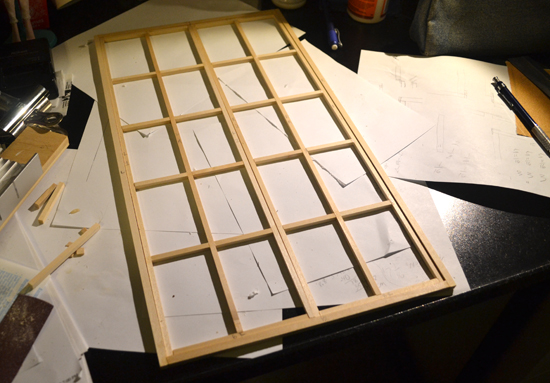
So, after everything is cut and ready to go, it’s time to apply the frames, we mitered the edges of the frame, but you don’t need to get as fancy if you don’t have the appropriate saw for the job. Just butting the wood together in L-shapes will suffice. After cutting all of our frames to the proper length we started by gluing the frames to the back side of the wall. Because the walls had a slight warp in them we clamped down all of the frames to the wallboard and let the glue dry for around an hour. Afterwards we put a nail through where the two frames met for added support and then used a special long and narrow staple to really secure the walls to the frame boards. It was keep at the minimum though because each staple creates a hole in the wall that will then need to be puttied and sanded to finish…less holes equals less work! However we were sure to do as many as we felt we needed too.

roombox-blank01

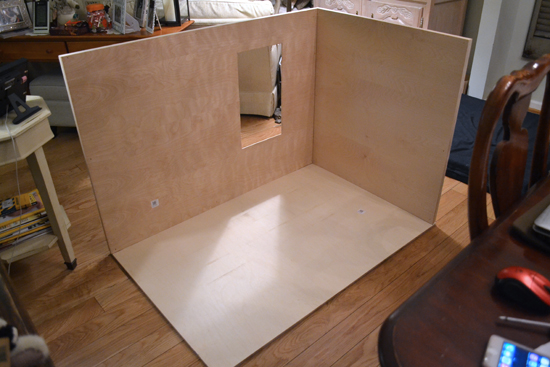
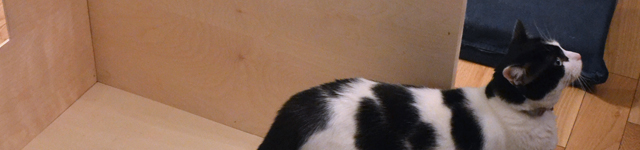
Ok, so after putting the frames on both walls, we then applies the hinges and set it on the base. You can kind of tell from the house interior that this thing is HUGE! XD Haha, maybe it’s overkill, but I’d rather have it be bigger than is needed than too small. Anyway I’ll go more into detail about the exact construction here with a few more photos.

wallback

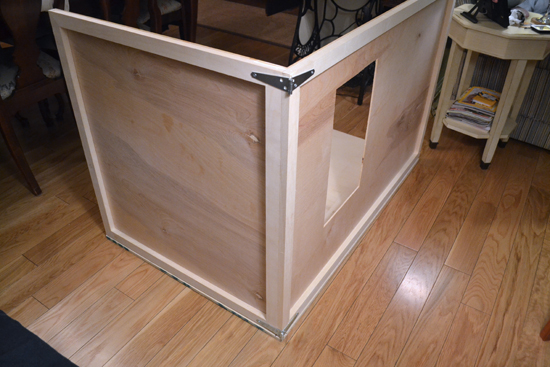
So here is a shot of the back of the box and you can see how the hinges are situated. The side wall “nests” against the back wall but the back wall’s frame edge comes out and meets flush with the edge of the side wall frame. It’s probably easier to see it so I got a close-up shot of the hinge.

hinge

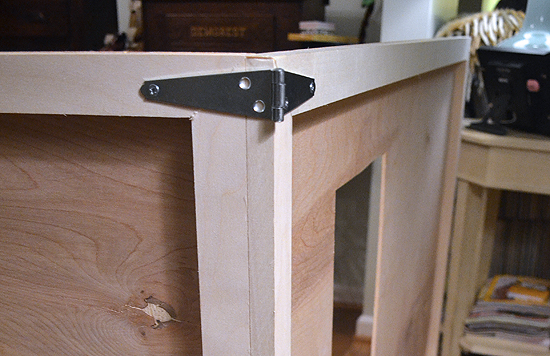
Here I think you can see the construction a little better. Basically you need to have your boards in position so that each hinge flap is PARALLEL to the board it is on so that it will come around and fold flat. This is how we arranged the wood so it does that. There is only one problem here however, but it will get fixed tomorrow and that is that the way the screw holes are positioned on the hinge, only one screw (the far one) is on the side wall’s frame. Tomorrow we plan to drill a hole through the metal in order to attach one more screw close to the edge for the frame board to prevent jiggling.

channel

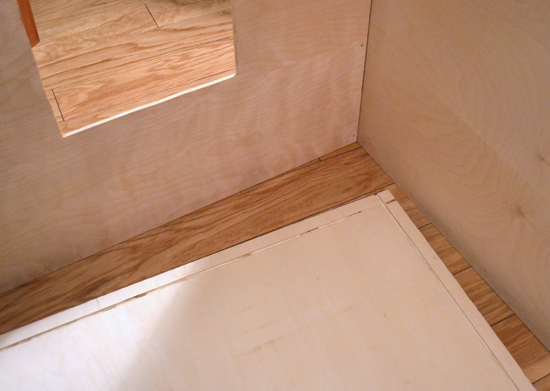
Now I want to show you the base real quick. We decided to try out sawing small channels for the walls to drop into for added stability. I feel the verdict is still out on whether or not it was a good idea, lol. Because the base also has some slight warping it’s a bit tricksy to get the walls to fall into the slot proper, but when it does it looks fine. If you were planning to make a room box of your own you could consider this an option, but I also tested setting my walls directly on my base (without slipping into the channels) and it also seemed fine. Lastly it pays to keep in mind that you can add baseboards to your walls to cover up any gaps you may have and make things look nice and tight.

foldingthehinges

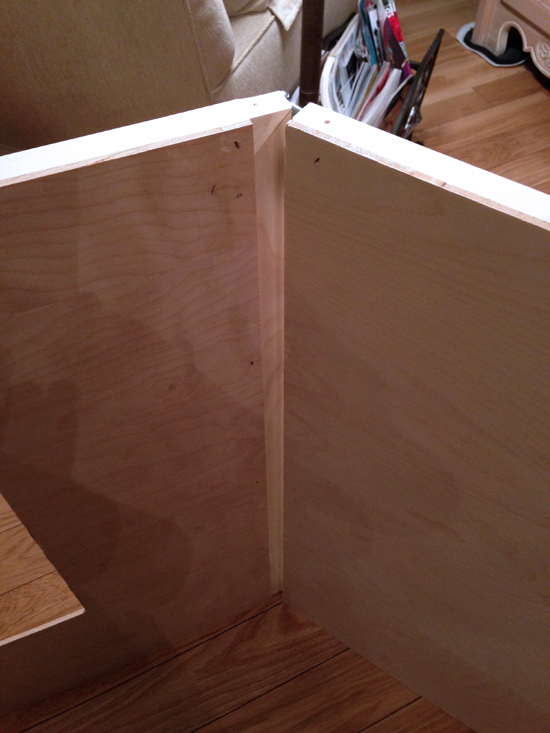
I thought I would go ahead and show you how this thing closes over on itself. I think it also helps to illustrate how it was constructed. You may also notice in this picture the small holes left by the nail gun from the staples. As I said before, those will be filled in with wood putty and made to be invisible. 🙂

folding02

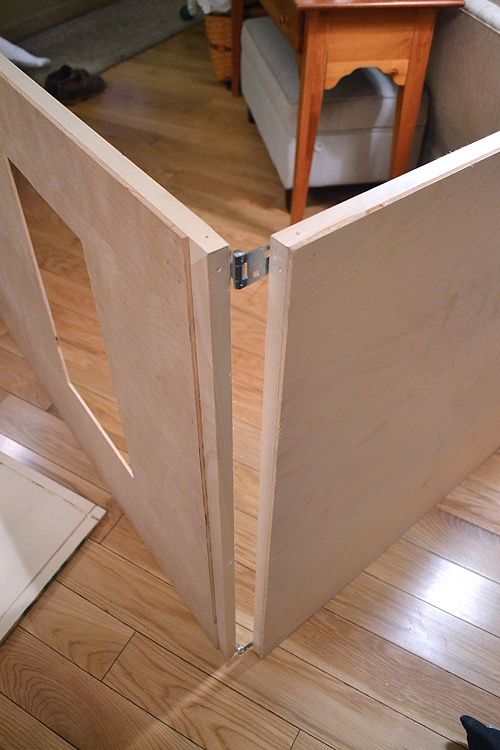
And further we go….Here you can see how the two hinge holes on the side wall don’t really get any purchase, on the side wall’s frame board. This gets fixed tomorrow though as we will make a new hole and add a screw.

folded

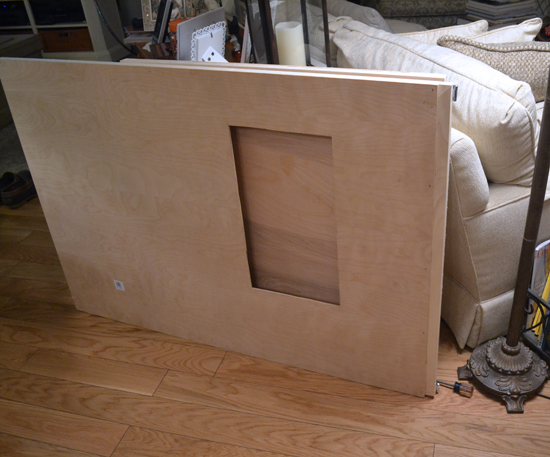
Lastly you can see here how it folds up. The side wall will end up protecting the window nicely from one side. If I do store this between the bedframe and the wall I will more than likely secure the window and then have the window side face the wall. If under the bed storage, I’d probably lay the window side down on the base.

So there you have it, this is the basic construction of the room box. Now comes the painting, flooring, window making and etc… to truly finish the piece. I’m hoping to have a little more time to work on it this weekend, but come Monday it’s back to work for me. XP Anyway I’ll be sure to share more things as I get them done…thanks for reading! I hope if you decide to build your own room box you have success!

Incoming dolls and other nonsense.

So, I decided to go for it, Taren’s sweet face and the sale compelled me to splurge on him. My order went in on August 18th and according to the forums the wait time for Withdoll is 2-3 months. Hopefully he will be in my hands before Xmas, and I really hope he arrives before I go out of town in January on a family vacation. I ordered him in the realskin UV as I decided it was time for me to branch out beyond all of the “normal skin” dolls. 😉 The idea of the sunscreen in a resin with translucence is what sold me though. I just hope it is as beautiful in person as I have seen in photographs. Taren will also be my first MSD boy, and he is filling a space in the collection that sorely needed filled. This means of course that I will need to shop for MSD boys clothes in the meantime so he doesn’t have to sit around naked. If anyone has any suggestions on which brands fit withdoll boys really well I’d love to hear them.

Aside from Taren, I’ve decided I am going to give it another try to order a Mio head. I will be participating in a new Dollmore GO that the same organizer is handling. I figure if I will ever be able to get a Mio head from a group order, it is going to be with this person! Haha, thankfully they have a good humor about it.

So with all that, I have to say this must end my doll purchases for 2013. I forbid myself from purchasing any more dolls until after the new year. *sigh* there are just so many pretty dolls and so little time and money to have them all.

An update on the Mio situation

I heard back today about what can be done in regards to me receiving the wrong head in the group order. It’s not an optimal solution, but it is not a bad solution. The group order organizer said she would buy the head from me and then I could try to order the Mio head again the next time she hosts a group order. In the end I’m glad that I won’t be out $100, but I am also disappointed in not getting the correct head. I really appreciate what the group organizer did for me though. I would tell you who they are on DoA so you can join in any of her group orders without worry, but I’m worried it might be an invasion of privacy so I’ll just leave it at this.

At this point I am not sure what to do about my SD sized girl plans. I already have the Zaoll body (and head) which has been in it’s box since the box opening. The thought has crossed my mind to just sell her while she is still new and forget about SD sized dolls. Though that would mean I would have a very lonely Mudoll Ash…and my Danbi rarely comes out of his box. ^^;;; On the other hand I feel I haven’t given the SD sized dolls a fair shake. I don’t have the necessary stands to display them, nor the space, which is why they hang out in boxes. To compound issues I just found some more lovely and mature looking MSD sized dolls at Withdoll. So now I’m feeling even more than I should just stick with MSD and round out my ranks there…As you can see, I’m just waffling all over the place, so I probably shouldn’t make any dolly decisions for a while.

Zaoll Luv Box Opening

So color me surprised when I woke up Friday morning, but my Zaoll had arrived! \(*0*)/ Because I never received a shipping notice or package tracking from Dollmore I just assumed my doll had not shipped yet and I would have to wait until at least their summer vacation was over to hear anything. It was a pleasant surprise though and I’m definitely not complaining about getting my doll sooner rather than later. Anyway on with the pics! Be warned this is going to be pic heavy!

box01

So….BOX! Of course my cat is ever curious. 😉 I love it when cats show up in other people’s box openings, so here’s my contribution, lol.

box02

And it’s open….I ordered a few clothing bits from Dollmore as well since I didn’t want my Zaoll to be completely clothes-less before I get a chance to make her anything.

box03

Here’s the freebies this time around. Looks like I got a little mesh shopping bag a couple of doll headbands with bows and a pretty decent pair of brown glass eyes that have a little bit of shimmer about them. I’m not sure what size they are though, but if they are the right size I may wind up using those instead of the black eyes I selected in my order.

box04

Wooo~ the gold Dollmore box. 😀

box05

Any removing the top cushion reveals the mummy inside! I kind of felt like I was tomb raiding or something when I saw this, especially with the gold box and a mummy shaped figure inside. Ha, that might be a funny idea for a photoshoot…but gods I would need more space before I could pull that off.

box06

And here we have the first glimpse of the girl. 🙂 Dollmore really goes out of their way to pack their dolls. I’m going to have to say that this Zaoll was by far the best packed doll I’ve ever received.

box07

One of the things I really like about the Zaoll sculpt are the hands. I always like it when there is a little bit of fingernail tips sculpted at the end of the fingers. Plus these hands also have a nice graceful pose. Unoa’s hands are still by far my favorite in terms of female hands though.

box08

Ok, so now it’s time for comparisons and such. Here she is between my Sona and Unoa Lusis. I am actually really super happy about the size of the doll. When I originally saw the box I had a little but of uh-oh feels because I thought she might be too big of a doll for my tastes. Really I think I am an MSD girl, but I really loved Dollmore’s Mio sculpt so I thought since the Zaoll body is smaller maybe I can have my Mio and a smaller doll. So far it looks like I can! I’m still waiting for my Mio head to arrive and then this Zaoll is getting hybridized.

box09

So, resin comparisons…On the left is my Dollmore Kid Sona, and Zaoll on the right of course. So, it is true, Zaoll has a pinkie tone to her resin. My Sona though is maybe around 4 years old now, so it’s possible she could have some yellowing, but in all honesty I don’t feel her resin has changed in color since the day I got her. Overall I think as far as my hybrid goes, I will just blush my Mio’s head a little bit to match the pink tone of the Zaoll skin. To be honest, after you get a doll fully clothed I don’t think most people would half notice the difference in photographs…especially since the shadow that happens between the head and the chin is enough of a demarcation line. I’ll take plenty of photos of course for reference once I get my Mio head. 🙂

box10

So, as far as single joint dolls go, I’m inclined to be of the mindset that she is very well designed because as you can see I was able to make her touch her face. Of course her hand is resting on her chin which helps, but I also had her with her hand in her hair and a finger to her lips.

box11

Her torso joint is very stiff right now, but you can make her bend forward a little. I don’t mind a stiff torso too much, because lately I’ve noticed that my Sona’s torso joint has been slipping a bit much. I have some cold temperature hot glue though so a bunch of my dolls will be getting hot glue sueded soon.

box12

Here she is again, this time with her torso turned a little bit to the right. So far she is a pretty good poser and stands and sits well. I haven’t had too much time to mess around with her yet since I have so many other things to do right now, but if I have any other reports to make I will definitely blog about them. 🙂

box13

So, lastly I’ll say a few words about the clothing I bought for her. To begin with the SD girl’s raglan shirt I bought her fits her well. They say that Zaoll loses more of her height in her legs which are a bit shorter it looks like than most SD dolls. I also bought a vrilla skirt, and a pair of white shoes, all which fit well. The Justo pants however, which are the jean pants in the picture, well they are a bit long, which is fine if you are looking for a longer sort of boot-cut style. All in all they fit well around the waist, but length wise if this is not what you are looking for then I probably wouldn’t bother with these pants.