Doll wigs, SD props and a Customs retention.

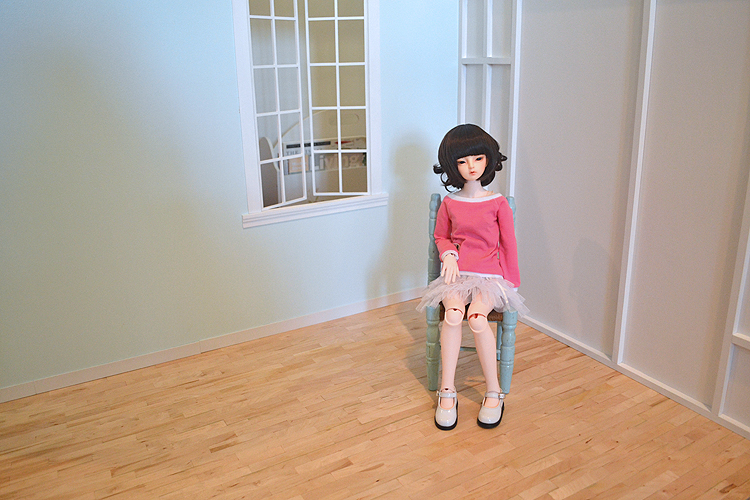
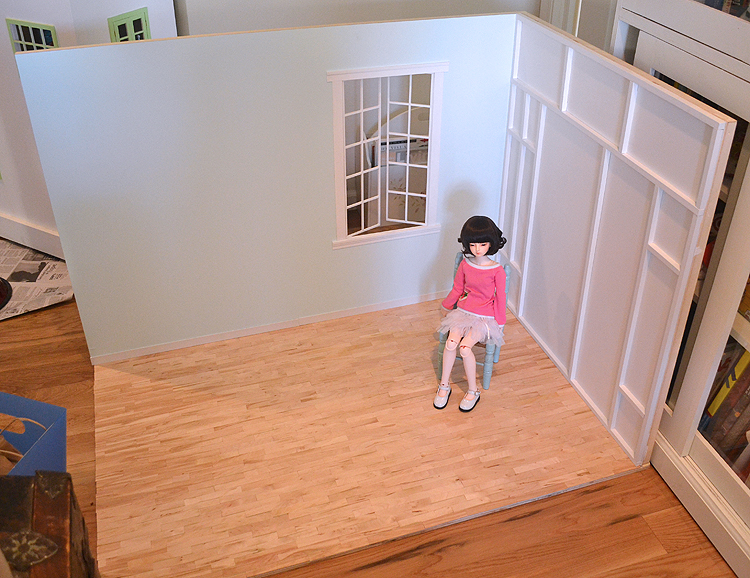
So a lot of doll related things have been happening, but I just haven’t had the time to blog since it’s been the holidays and I am trying to get everything together to go on vacation in January. The first thing that happened is the wig and headband I ordered in a For My Doll GO arrived. Here is a shot of Lulu in her new wig and Sona is wearing Lulu’s old wig.

sonaluli01

I have to say that this is the second wig I have ordered from For My Doll and I couldn’t be more pleased with the quality of wigs from that shop. Frankly I consider my FMD wigs to be of better quality than the one Leeke wig I own. Anyhow, I really like this wig on my Lulu, but I’m not sure how I feel about Sona in Lulu’s old wig. It’s cute and looks a bit more mature over her old pigtails, but I think I may still be questing for a wig yet for Sona. I think maybe I also need to try to buy other colors of wigs besides brown, but I just can’t help it!! I love dark brown hair and FMD’s “mild black” is the perfect deep brown.

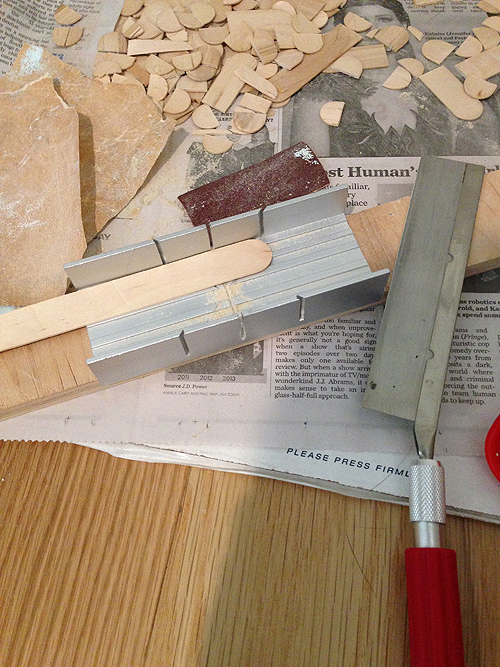
Aside from the wigs, I’ve begun working on creating an SD sized bed for the first piece of furniture for my room box. I have my plans all drawn out and my wood bought, but I’ve only just begun cutting and painting. I really hope I get a chance to work on it some more before my vacation because I’d love to make a blog posting and share my progress, but I also have to double up on my work so I don’t have anything due over vacation AND I also have to finish hemming my dress among other vaycay prep.

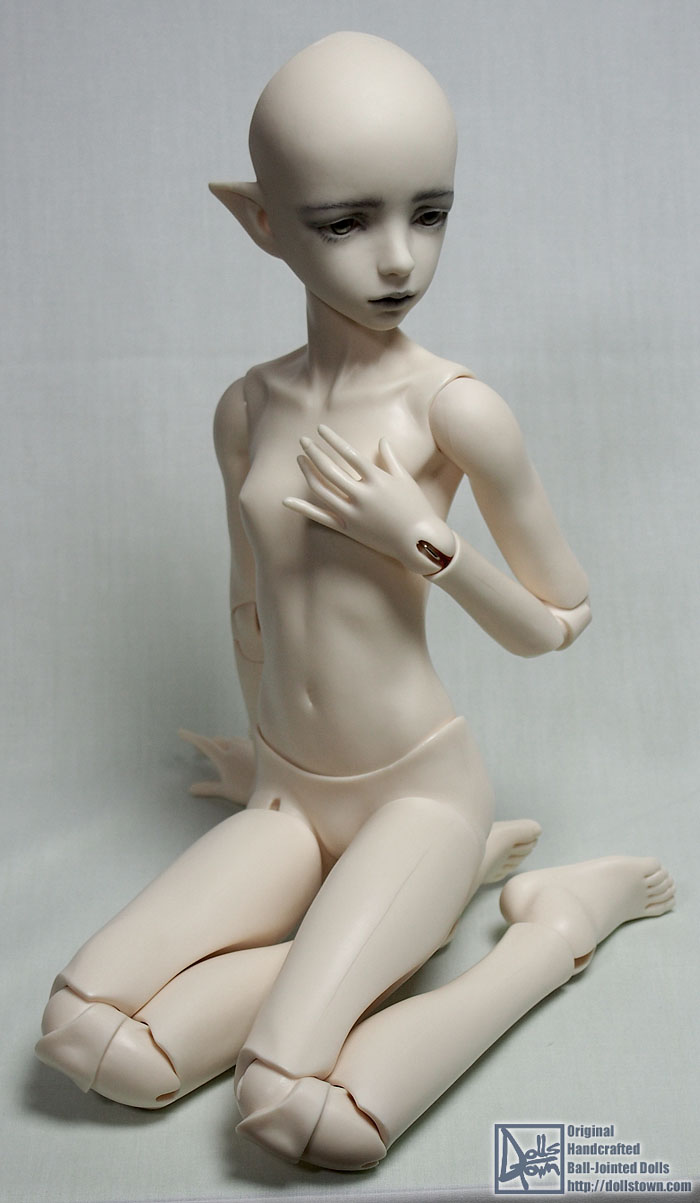
Lastly the Dollstown elf body shipped a couple days ago and I was super excited to follow it’s tracking until suddenly after arriving in Chicago today it was detained by Customs saying “customs retention: other” D: I’ve never had this happen before so I popped on DoA to see if anyone else had this trouble before and sure enough there is a thread dedicated to it in the buying and shipping section. After reading through the thread I feel a little better since another user said that packages are processed through Chicago’s customs very fast. I’m really hoping that it only has that status since it arrived after 6pm on a Saturday and it just waiting for Monday’s work week to come around. I am going to be a bundle of nerves until this body arrives since I will be leaving on the 17th for vacation and it must arrive before then! D: I’m going to keep my fingers crossed that my package clears customs on Monday. The last thing I need is for it to get stuck in customs for a week or more and then ship when I am gone. I’ve heard where EMS packages won’t be kept for any longer than 5 days even in vacation hold mail. Oh man….I just don’t think I can say this.. D: enough…lol. If this has taught me anything it’s to not order things before vacation, even if it is in stock and will ship within a week and you still have a month left before vaycay so it should be “safe”…because apparently everything will go wrong.

Ermagerd, SD roombox is DONE! O:

I finally finished the roombox today!!! Yay!! I thought I was finished yesterday and then I realized I totally forgot to add the back wall’s baseboards and I was like (⌣_⌣”) *sigh*, but I quickly cut and painted them last night so they would be ready to be glued on today. Anyway without further ado, here are a couple shots…(yeah I need to get better at photography, that is the next goal along with making props).

mio'shouse01

Here is a shot of the whole room with Mio sitting in it. The chair is a little doll chair I found at an antique store. It’s a bit shabby and probably needs a bit of washing, but it’s cute and the perfect color for the room! Actually Mio sits on that very chair on my nightstand in my room. 🙂

mio'shouse02

And here’s a zoomed out shot that better shows the scale of the room. Please ignore some of the junk in the background. I still have a few things to clean up now that construction is done.

Well, I’m really happy overall with how it turned out and I hope I get a chance soon to take more photos with it and improve my photography skill. I also want to make a little fake backdrop for behind the window so it looks like there is some nature out the window. I was thinking I could make a large print and pin it to foam core board or alternately I have some inkjet transparency paper left so I could experiment with printing greenery on that and then shine a light through it to see how that looks….Definitely got to get better with lighting overall though.

Hybrid Fever.

After putting Mio’s head on a Zaoll body I’ve become A LOT more open to hybrids, especially since I’ve become a lot more fussy in terms of body sculpt both in aesthetics and functionality of joints. Also I’ve surprised myself and I’m finding out I really do enjoy owning the big dolls, though Mio is a shorty, but still. So in a flush of new found love for 60cm dolls my brain decided to hatch a plan as to what sort of companions she needed. XD

I think I have wholly decided on Supia’s Zion sculpt for one of her new companions, but Zion is also a 65cm doll, which means Mio will look very tiny next to him. Then I thought perhaps I could find a slightly shorter body to put his head on so the size difference won’t be so great. This was when I discovered both Spiritdoll and Dollstown, who both have extremely lovely body sculpts with nice jointing systems. Unfortunately it’s been difficult trying to find information as to whether any of the Dollstown or Spiritdoll resins will match, but overall it’s not looking good sadly. However I am not letting it deter me because……

OLYMPUS DIGITAL CAMERA

I ordered Mio the Dollstown Elf girl body in freshkin! You may wonder how I arrived at this since I was all about Zion a moment ago, and it was a long chain of events let me tell you. So to begin with I knew I wanted the elf body when I saw it, because the sculpt is just really beautiful, not to mention it has double jointed knees and arms, AND it’s another shorty girl coming in at the same height as Zaoll at 52cm. 🙂 After researching potential resin matches with Dollmore resin, and double checking measurements, I came to the conclusion that I could upgrade Mio’s body and then I would be able to give my Zaoll Luv back her body. So then I can have two girls instead of one now. 😉 On top of this I will then have a sample of dollstown freshskin resin to do comparisons with for future hybrids. I just have to hope now that since the elf body is in stock that it ships soon and arrives before my vacation in late January. I probably should have waited to order until I returned, but then that would mean I would have had to force myself to wait for nearly two months before ordering and then knowing my luck it wouldn’t be in stock anymore and I’d have to wait another 2 months production time XP. So I’ll be keeping my fingers and toes crossed that she ships within 2 weeks and arrives here in early January. Annnnd I’ll be keeping some extra fingers and toes crossed that Mio’s head will fit well on the new body. The Dollmore Eve neck circumference is around 7.5 and the elf body’s is 7.8 so it should work in theory. I also hope the resin match is close….it does look close from the comparison shots I found and that people shared with me, but it is still probably going to require some blushing.

As for Zion….well I had remembered my original idea that the size difference between a tall boy and a short girl is part of what makes it interesting, so I am considering ordering him as a whole doll with the supia body. However, the boys are out of stock on the Supia site and I read where they won’t be available until early 2014, because their bodies are being re-worked. It was also added that when the new boy bodies are ready they will be having another event as well, so my plans for ordering Zion will wait. To be honest, at this point I hope it will be a spring event this way I can stockpile my money until then, lol.

BJDs that look Asian.

Since it’s kind of difficult to search for BJDs that look Asian without most of the search results in google being about ABJDs on a whole and not necessarily ones that look particularly Asian, I decided to start a collection of images of Asian looking dolls on Pinterest. Each pin lists the sculpt, maker and size of the doll so you can easily find them on company websites. I’ve only just started my list with around 19 pins, but I plan to continue adding to it in the future, especially since right now I am of the mind to own a 60-65cm Asian looking male BJD to be a companion to my Mio. So, without further ado, here is the link to my “BJDs that look Asian” pinboard. 🙂

http://www.pinterest.com/tsukiyono/bjds-that-look-asian/

SD Room Box – Flooring

I’ve been meaning to blog about the room box flooring for a while now, but it’s been so busy around here and then my Taren arrived, heh. Anyway I’ve made quite a lot of progress on the floor so now I feel I can make a substantial process blog about it. So without further ado, here is how I went about making my room box floor.

miterbox

So, materials wise I thought I would try using craft sticks, the jumbo variety that look like tongue depressors. With my craft saw and miter box I sawed off the rounded ends and then started gluing them to my plywood base.

woodfloor

Here is a progress pic of the gluing process. I also want to mention that you need to be sure to have some heavy objects to weigh down the planks of wood after you glue them because glue is wet and causes the wood to warp slightly before it dries. Weighing down your floor will keep things more uniform and save you from having wood planks punking up from the base in an unsightly manner. I suppose I should also mention that I did not cut all my wood and do a test layout of the whole floor. I worked two rows at a time and just made sure that none of the end seams lined up. I wanted the floor to look as close to a real hardwood floor as possible so I strafed all of the board ends and tried to make it as random as possible since real floors are random, well at least ours is.

floorproblems01

So, you are definitely going to encounter problems when working with craft sticks, and the above picture is one of them. Because craft sticks are not uniform in size and some warp slightly you are going to get gaps between boards, especially when you are working at 1:3 scale. To solve this you will need to fill in the larger gaps with a wood filler.

woodfiller

I used the wood filler in the picture above to fill in my gaps. To be honest I was not all that impressed with this wood filler, and I probably would have selected something different, BUT this came to me free from my father’s workshop so I can’t complain too much. The thing about this wood filler is that it has tiny chips of wood in it and I would have preferred something with a much finer grain about it. Lastly I wanted to mention that I used one of my palette knives to apply the wood filler. It really makes filling in the gaps so much easier than using a regular old spackling knife since it’s more to scale.

puttyincracks

And here’s where I have filled in some of the gaps with the wood filler.

sanding

The next step is to sand the whole floor. Sanding the floor will help you get rid of the slight bumpy irregular feeling your floor will have that just comes with using popsicle/craft sticks, not to mention that it will prime your floor to take a stain and/or varnish as well as smooth out your wood filler. I really think this is a necessary step if you are making a floor using craft sticks. I don’t care if you say you want it to be “rustic”, it’s not a “rustic” issue, it’s a craftsmanship issue, because even a good rustic floor has good craftsmanship. Haha…sorry for the lecture. XD

polyacrylic

I opted not to stain my floor and decided to go straight to varnish because I just really like the light natural look of wood, plus I think it will be a nice compliment to the shabby beach theme I’m going for with the room box. I had been at a bit of a loss as to how to finish my floor though, because for one thing it’s winter where I live and using a polyurethane varnish inside the house, well I think you can imagine the smell and the headache afterwards. XP My other reservation to using a polyurethane varnish was that I have in the past had issues with some of the plastic or rubber soled doll shoes sticking to the flooring if left sitting on the flooring for any period of time. If not polyurethane varnish, your other options are to use linseed oil or a polyacrylic varnish, which is basically an acrylic varnish that washes up with water and is less smelly. As you can see from the pic above I opted to go with the polyacrylic varnish and I am currently waiting for my first coat to dry so I can gently sand it and then apply another coat.

flooronecoat

This is my floor after one coat of the semi-gloss polyacrylic varnish. I ended up doing a really thin coat so it will probably take me 3-4 coats if I keep on like this with the ultra thin coats, but I think in the end it’s better to apply thin coats and build up to a nice semi-gloss. I chose semi-gloss because I didn’t want my floor to look too shiny since the floor looks a bit rustic and I would rather it look a bit more like a worn beach house floor than something high gloss and brand new.

So, now all that I have left is to sand, varnish, sand, varnish until I get the finish I want. I’ll be sure to post up a pic of the finished floor after this. I am getting excited because I am getting closer to having this room box finished! I am getting antsy to start working on some 1:3 scale furniture and props so I want to get it done within the next couple weeks!