Unoa and Dollmore Kid Comparison

unoasonablog

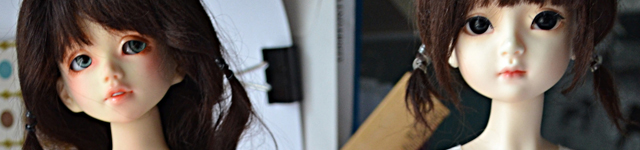
Someone on DoA requested a comparison shot of a Dollmore Kid with other MSD sized dolls, particularly how the slim MSDs like Narin and Unoa looked together, and I was happy to oblige. I thought I would go ahead and expand on the comparison shot a little bit for my blog though in case it might be helpful to others.

So first of all you can see how my Lusis has a slimmer waistline and is more in proportion with an adult female. Overall the bodies are nearly the same length, Sona just has a slightly longer neck which makes her appear a tiny bit taller than the Unoa. However Sona’s arms are a bit longer than the Unoa and her hands are definitely larger. Overall these two girls as they are can share loose fitting clothing like dresses and shirts.

Unoa has a larger bust, but Sona makes up for that in overall girth. Basically all of the Dollmore kid is just a little larger in girth than the Unoa, but this goes doubly do for the thighs near the ball joint. Dollmore kids kind of have “thunder thighs” lol. Anyway because of the differences in the thigh and hip area, they aren’t particularly suited to share pants, but you can get away with some skirt sharing, and possibly even loose short sharing if you are into that kinds of look.

Lastly, Dollmore Kids have huge feet. You can clearly see the size difference in the picture. Really I think Dollmore Kids must have some of the largest feet on an MSD because it is not uncommon to buy shoes that would work for an SD or SD13 girl and have them work on the kids.

Well I think that’s about it for my comparison chatter. I won’t discuss resin comparison because A) My Unoa is blushed, B) My Unoa has some yellowing and C) My lighting blew out Sona a little bit because I don’t consider her that white!!

Unoa Lusis Body Blushing Done!

So, yep, as the title states, I finally finished blushing her and she’s all restrung now. Unfortunately despite being careful I already chipped the body blushing while taking these photos. :p However it’ll be in an area that’s clothed so I’m not feeling broken up about it. Really I’m just so glad to have her back together and looking fantastic. The wigs still need to be styled in these shots, but she is really coming together towards the look I want. :3

read behind the cut for full body pics

Unoa Lusis – New Face-up!

So, here she is finally with a new face! It seems like it took me forever, and I still wasn’t able to accomplish everything I wanted, but it’s a learning process and I am very happy with her. 🙂 I think she looks pretty awesome in the dark brown wig, but I also tried the red wig on her as well and she also looks good as a redhead. I’m not sure which wig she will get in the end. I figure I’ll decide that after I finish the body blushing. As it turns out, I botched the feet blushing twice due to sealant problems, and then I botched the face-up on the second face-plate due to my own error. :p Because of all this I am now out of sealer, so I will have to get a new can of sealer before I am able to finish the body blushing. Now that her face is done I’m super excited to put her back together and dress her up! Unfortunately it will rain tomorrow or I’d plow right through everything, but I’ll have a chance to work on her again this weekend. Anyway I’ll end by re-posting the pics I took of her when she first arrived to me so you can see the difference!

Progress on sanding my Unoa Lusis.

I finally cleaned off my drawing table today so I could start working on customizing my Lusis. I decided to start with her secondary faceplate, the one that has it’s mouth open a little wider. As you can see from the pic above, her open mouth is asymetrical with the right side being more open than the left. I decided I would do some carefully carving of the left corner of her mouth to give her more symmetry. To do this I decided I would use one of my clay carving tools that has a curved bladed edge that whereas it is sharp enough to carve, it isn’t as sharp as a exacto blade. You can see the tool I was working with in the picture.

Read on behind the cut

Removing Lusis’s Face-up

I started removing the two face-ups from My Lusis faceplates last night, which turned out to be quite a lot of hard work, though it did provide amusement. You can see from the pic above that I was literally peeling the lip paint off of this doll, this is how thick the paint was applied. ^^; For the most part though, after a swipe with isopropyl alcohol and a soak in warm water I was able to peel a lot of the paint off with my fingernail. However the corners proved to be stubborn and I had to carefully use my clay-working needle tool to carefully prick and pull out the paint that was crammed into tiny corners. The eyes also had a lot of dried glue around them which required a lot of soaking in warm water to get the glue pliable enough so it could be removed. There were a couple spots of paint in the eye wells that didn’t want to come off for me despite resorting to using acetone on them, but I chalk it up to being the rough surface that needs a gentle sanding. Anyway I have to say that if you can peel off your face-up like in my pic above, “UR DOIN IT WRONG!” XD (the face-up that is).

Here they are all cleaned up and ready for customization. As you can tell from the photo, Lusis R (right) has her mouth opened a tiny bit more than Lusis L (left). Also Lusis R’s mouth is a tad asymmetrical. I think I should be able to fix this easily enough with gentle sanding. For Lusis L, she’s in great shape except the seam line around the edge of her plate is rough and needs a little sanding. Both of these girls just need a little gentle finishing sanding really, but overall they are in excellent shape. I suppose I should also record that both of them have had their eyebrows sanded, however there is a very slight, faint sort of smooth ridge where they used to be. I’m not sure if I will sand them any further or not. I guess we’ll see when I decide to start working on their face-ups.